Home Inspections

four-point inspection

A four-point home inspection is often needed if your homeowners insurance policy is up for renewal and you own an older house. Your insurance company will sometimes ask that you get this type of inspection completed as they work through their underwriting procedures.

What is a Four-Point Home Inspection?

Here is what your inspector will look at while conducting this type of inspection:

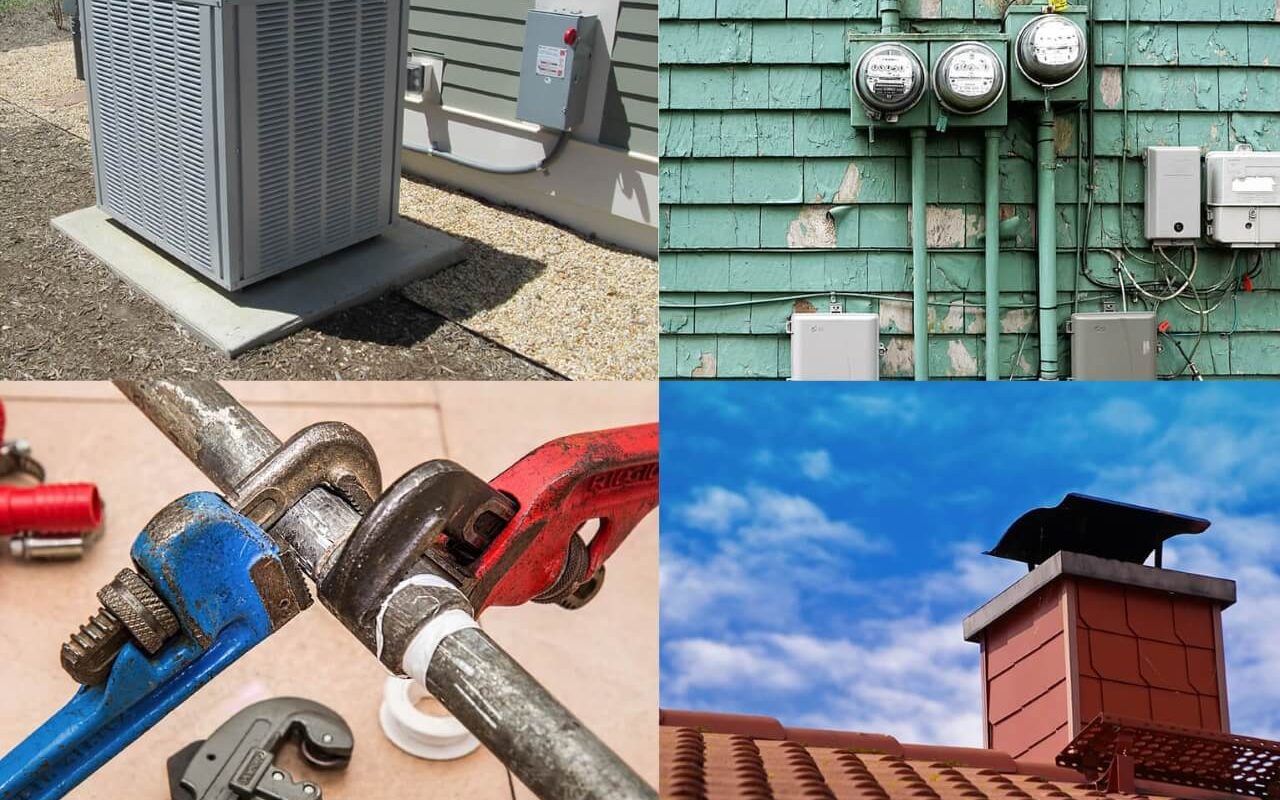
  • HVAC (Heating, Ventilation, and Air Conditioning): This is checked out when you have a central air conditioning and heating system. The inspector wants to look at the overall condition of your HVAC system and to see whether there are signs of damage. HVACs are expensive to replace.
  • Electrical Wiring System: The inspector will look at the wiring in your home. It’s possible you’ll be denied coverage if your home has aluminum wiring. Insurance companies take electrical problems seriously because old or faulty wiring can cause house fires. You’ll need to upgrade your electrical system if your home is deemed uninsurable because of the wiring.
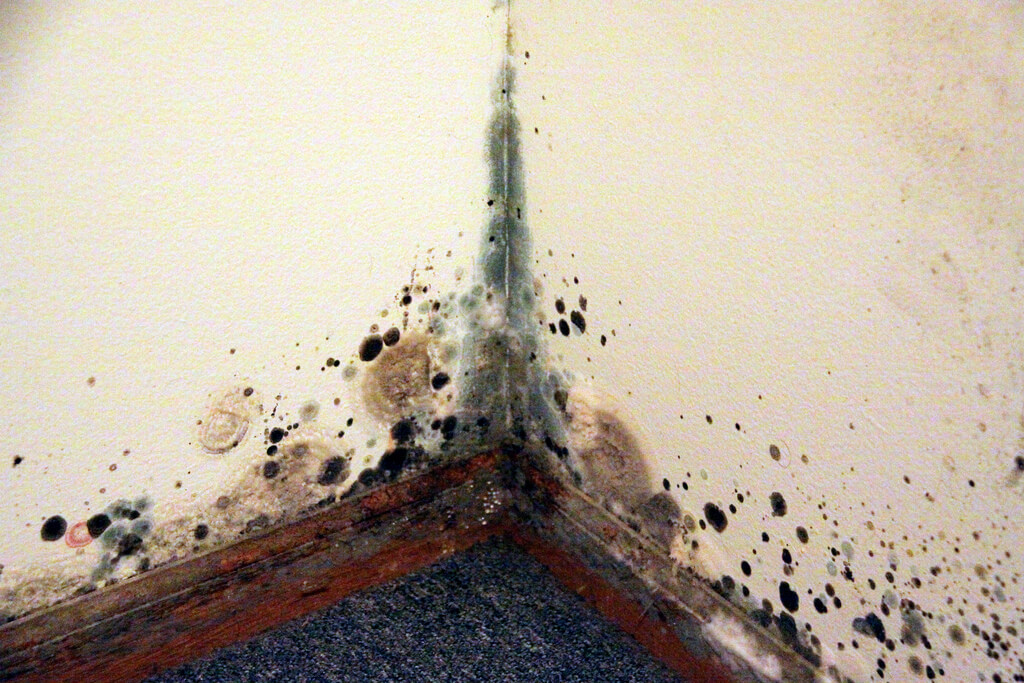
  • Plumbing System: The four-point home inspection looks at the home’s plumbing to determine if the pipes may leak or burst. Polybutylene plumbing has a high likelihood to fail. You may be denied coverage if your home has this type of plumbing. Another possibility is that you get insurance without water damage coverage.
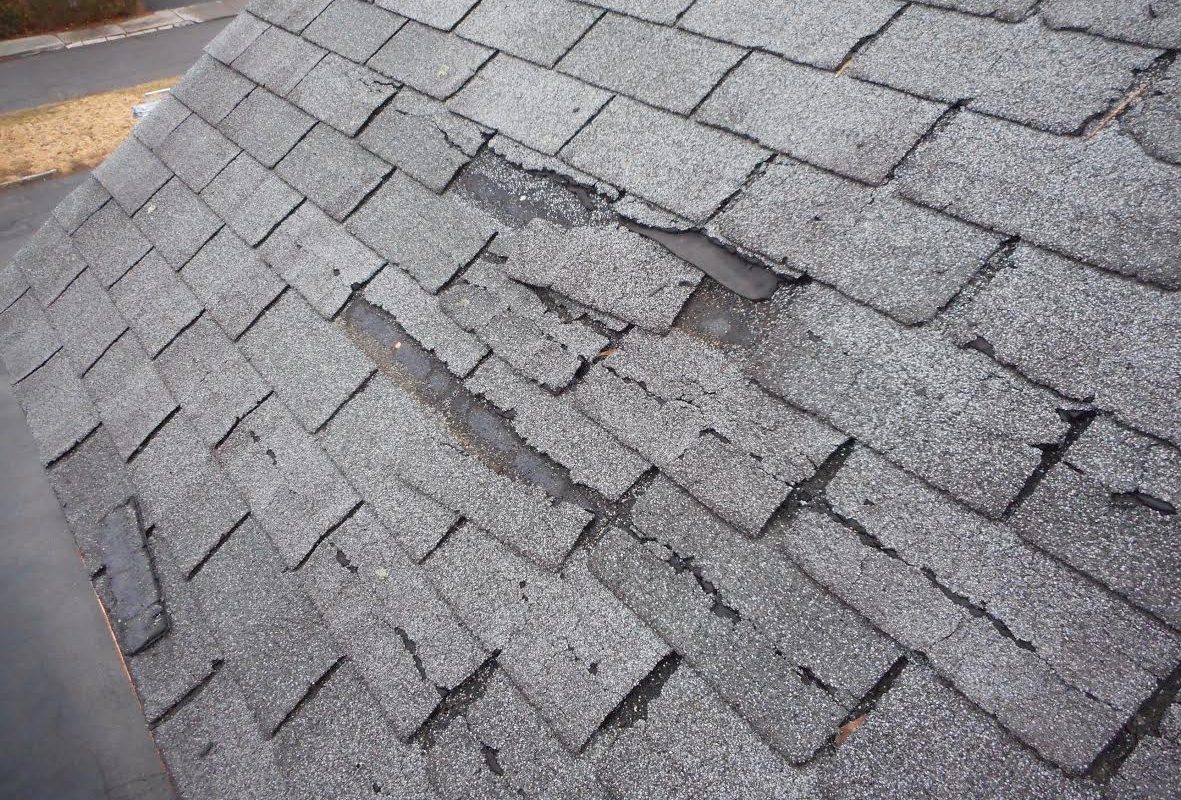
  • Roof: An inspector looks at the roof’s material, age, and overall condition. If your roof is damaged or nearing the end of its lifespan, it may not get insured. Other issues that may cause non-coverage are water leaks inside the attic.

If you need help with roofing, you can visit sites like https://kanga-roof.com/service-areas/troy/ or https://www.brownboysroofing.com/springdale/.

When Might You Need This Type of Inspection?

A four-point home inspection is generally ordered when you need to qualify for homeowners insurance and does not take as long as a full home inspection.

A four-point inspection is used to inspect areas of the home that typically cause insurance claims. It’s often required in coastal areas where severe weather can cause widespread devastation.

Differences When Compared to a Full Home Inspection

A four-point home inspection is limited to the four components of a home mentioned above. A full home inspection is far more comprehensive and includes, but is not limited to, items such as:

  • Garage
  • Structural integrity
  • Kitchen fixtures
  • Bathroom fixtures
  • Kitchen appliances
  • Interior and exterior areas
  • Windows and doors
  • Attic and insulation
  • Siding and stucco
  • Patios, porches, and balconies

Once your four-point home inspection has been completed, your inspector will inform you of any repairs that need to be made. The insurance provider will review the report to determine your homeowners insurance plan.

Affordable Remediation and Emergency Services
Phone: (732) 540-7900
Url:
1415 Hooper Ave
Toms River, NJ 08753

Read more

expect as a new homeowner

Congratulations, you have successfully purchased your first home! While you’re likely breathing a sigh of relief, get ready for all the new responsibilities and situations that come with being a homeowner. Here are 6 things you can expect as a new homeowner.

1. Mail Solicitations are Something to Expect as a New Homeowner

One thing to expect as a new homeowner is a lot of mail. Much of it will be solicitations and junk mail. Some of it will be from other mortgage lenders, claiming that they can offer you a better interest rate. Other companies will also solicit your business by mailing you special offers. For the most part, this is junk mail that you can simply recycle.

2. Paper Work From Title and Escrow

If you see mailings that look like they’re from your lender or bank, don’t throw them away. They might be important documents from your escrow company. At closing, ask the escrow officer what communications you should expect to see from them in the future.

3. New Utility Bills

Before you closed on the home, you may have inquired about the cost of the utilities. After you move in, you may find that the bills are more than your previous home. Perhaps you have air conditioning now and didn’t have it in your old house. Ask about the utilities before closing, but know that they are only an estimate and not a guarantee.

4. Expect an Insurance Inspection As a New Homeowner

After closing, your homeowners insurance company may send someone by for a visual inspection. They are looking for safety issues that could hurt someone or compromise the property. For instance, if it needs HVAC repairs, you may need to contact experts like https://chilltexllc.com/ or https://www.sharplong.com/. Also, consider that the HVAC system is well-functioning and make a heat pump repair if needed. The insurance company will contact you ahead of time to schedule an inspection.

5. Increase in Property Tax

The tax on your property is one payment that will fluctuate. The county appraiser will assess the value of your property and your taxes may change as a result. As your home gains value, the taxes on it will rise. Since these are usually combined with your monthly mortgage payment, you may find yourself paying more or less per month over time.

6. A New Lender

After closing, your lender may sell your loan. Banks can bundle together home loans and sell them. The two largest purchases of mortgages are made by the government agencies Freddie Mac and Fannie Mae.

These agencies were created to buy mortgage loans from banks and other financial institutions so that they can offer to finance more homebuyers. If your bank had to carry all the loans it originated, it would eventually run out of money.

Freddie and Fannie make it possible for credit unions and banks to continue to originate loans. If you are in a fixed-rate mortgage, the conditions of your loan must always remain the same, but who gets the payment might change over the course of the loan.

When you get a notice that your mortgage lender will be changing, call your original lender to confirm its authenticity, and then make arrangements to send your monthly payment to the new owner.

If you intend to have a rental home as an investment and a source of extra income, as a property owner, you have the option of managing the property yourself or hiring a property manager to handle it for you. Above all, it is the obligation of the property manager to keep the property profitable. Property Management London takes pride in treating your investment with the highest care and respect.

Walton Inspection Services provides home inspection services. Contact us if you are buying a home in Murrells Inlet or the surrounding area.

Read more

pool maintenance

With the temperatures rising, your swimming pool becomes an even more popular place to spend time. To keep the water clean, healthy, and safe throughout the summer, it’s important to perform routine swimming pool maintenance. Let’s look at seven important tasks to make sure your pool is ready to enjoy on hot summer days.

Important Steps in Swimming Pool Maintenance

1. Pool Maintenance Includes Skimming Twice a Week

A few leaves floating on the surface might seem like no big deal. However, if you don’t skim them off regularly, you make more work for yourself later. Leaves absorb pool chlorine, which can cause a chemical imbalance. The leaves also decay and eventually fall to the bottom of the pool, encouraging algae growth.

2. Vacuum the Pool Once a Week

Even with regular skimming, debris will settle to the bottom of the pool. Routine vacuuming is important for swimming pool maintenance. A manual pool vacuum can do the job, though it’s labor intensive. The better option is investing in an automatic pool vacuum. It does the work for you and saves time for other pool maintenance needs.

3. Balance Your Chemicals Twice a Week

When a pool’s chemical levels get out of balance, the water becomes a breeding ground for bacteria and algae. Testing the water for healthy pH levels alerts you to a potential problem. Ideally, the pH should be between 7.2 and 7.8. Testing kits are inexpensive and only take a few minutes to complete.

4. Pool Maintenance Includes Cleaning Your Filters as Recommended

Pools can have any combination of three different types of filters: cartridges, sand, and diatomaceous earth. These filters keep your pool water clean and clear. However, if you don’t clean and maintain them, they aren’t able to do their jobs properly and your water quality will suffer.

5. Clean the Pool Deck Once a Month

This is probably the most commonly overlooked pool maintenance step. You spend time and money keeping your pool in pristine condition. However, if the surrounding pool deck is dirty, your pool will not be healthy and clean. Take time at least once a month to scrub and wash the surrounding deck.

6. Scrub the Pool Edge Once a Week

One of the hardest jobs for pool maintenance is scrubbing the edge of the waterline. Scale and stains build up there, no matter how well you keep the rest of the pool clean. Once the scale starts to develop, it’s difficult to remove. Swimming pool maintenance includes scrubbing the edge at least once a week to maintain a clean water line.

7. Refresh the Water a Few Times a Year for Proper Pool Maintenance

Swimming pools have high concentrations of salts and metals like copper, iron, and chloride that interfere with keeping the pool clean and can create brown stains on the pool surfaces. The easiest way to lower the concentrations of these salts and metals is to add fresh water to the pool a few times each year, and whenever the water level falls below the skimmer opening.

Walton Inspection Services provides swimming pool and spa inspections to Murrells Inlet and the surrounding areas. Contact us to make sure your pool is ready for summer.

Read more

types of decking materials

Which Types of Decking Materials Are Best For Your Home?

Adding a deck onto your home is a great way to increase your outdoor living space and the value of your home. Let’s look at some of the different types of decking materials that you can choose from.

1. Pressure-Treated Wood

Pressure treated lumber is one of the most popular types of decking material. Most often the wood is pine but can be other types as well. The wood is chemically treated to make it durable enough for an outside deck.

Pros:

  • It’s the most affordable options for decking materials.
  • Pressure treated lumber is one of the easiest types of decking materials to install. It’s easy to cut and easy to secure with screws or nails.

Cons:

  • The wood will deteriorate over time, causing cracks and warping.
  • Wood decking may splinter.
  • Pressure treated lumber requires maintenance. Pressure washing will keep it clean. The wood will need to be painted or sealed every few years.

2. Cedar and Redwood are Attractive Types of Decking Materials

Cedar and redwood aren’t chemically treated like pressure-treated lumber. The tannins and natural oils in the wood help protect it from the elements. These types of wood are sold by grades, with the center cut of the tree being the highest grade.

Pros:

  • The natural beauty of the wood grain makes cedar and redwood aesthetically appealing types of decking materials.
  • Cedar and redwood will last longer than pressure-treated wood.

Cons:

  • The deck will need to be power washed once a year.
  • A fresh coat of sealer will need to be applied every couple of years, depending on where the deck is located.
  • The wood decking will need to be stained to keep its color.

3. Composites

Fabricated plastic or composites are also common types of decking materials. They can be manufactured using wood scraps and recycled materials, or constructed entirely out of polyethylene or polyvinyl chloride plastics.

Pros:

  • This decking material won’t splinter.
  • Easy to maintain: there’s no need to paint, stain, or seal composite decking.

Cons:

  • Composites made with wood scraps will decay over time.
  • The plastic materials can collect water, causing mold and mildew to grow.

4. Aluminum

If you are looking for a clean-cut looking deck with a bit of an industrial edge, aluminum may be the choice for you. The biggest advantage is that it will practically take care of itself, requiring almost no maintenance on your part.

Pros:

  • Aluminum won’t rust, splinter, or crack.
  • The finish won’t fade or peel.
  • It’s resistant to mold and mildew.

Cons:

  • The cost is higher than some other options.
  • It can be noisy when people walk on it.
  • It can be more slippery when wet than other decking materials.

5. Tropical Hardwoods

If you are looking for unique types of decking materials, tropical hardwoods are strong and durable and could be an ideal choice.

Pros:

  • You can select tropical hardwoods from sustainable sources, making it less impactful on the environment.
  • Hardwood decking can last up to fifty years.

Cons:

  • Tropical hardwoods are the most expensive of these types of decking materials.
  • They are difficult to install.
  • The hardness of the wood makes it resistant to stains and sealers.

Walton Inspection Services provides home inspection services to Murrells Inlet and the surrounding area. Contact us to schedule our services.

Read more

pre-listing home inspection

In order to avoid any surprises that a buyer’s home inspection may bring, sellers should have a pre-listing home inspection after looking at sites like https://landmark24.com/. The inspection report will give the homeowner more information about the house before it is listed for sale. Read on to understand the benefits of pre-listing home inspections.

Benefits of a Pre-Listing Home Inspection

Hiring a licensed home inspector before listing your home for sale is important so you will know of any issues prior to the buyer’s inspection. If there are problems that could potentially sour the deal, you will have the chance to make repairs before you even list the house.

If you know about an issue and you decide not to fix it, price the home accordingly and disclose the problem to the buyer up front. Sharing an inspection report with the purchaser builds trust because it shows you have nothing to hide.

1. Homeowners Can Value The House Accurately

Using the information from a pre-listing inspection, homeowners can consider flaws and damages when pricing the home. Along with considering the market value, homeowners must be aware of what certain and repairs will cost the buyer.

With this in mind, homeowners can reduce their selling price to allow for the projects that the buyer will have to invest in. Sellers can also make the updates and repairs themselves and include that cost in the final asking price.

2. Pre-Listing Home Inspections Give Sellers an Upper Hand during Negotiations

Once the pre-listing home inspection report is in hand, it helps sellers get the best value out of the transaction. If the buyer finds out the home needs extensive repairs, they will likely try to negotiate a lower price for the property.

When the seller discloses any concerns up front, the homebuyer’s offer may be closer to the asking price and there will be fewer negotiations to slow down the process.

3. Reduces Roadblocks

A major roadblock for homebuyers is the undiscovered problems that might be revealed during the buyer’s home inspection. Because of this, a pre-listing home inspection becomes more attractive from the outset.

When a potential buyer sees what he or she is purchasing from the beginning, he or she will feel more confident and comfortable in making an offer.

Walton Inspection Services offers pre-listing home inspections for sellers and other inspection services to Murrells Inlet and the surrounding areas. Contact us to schedule your appointment.

Read more

prevent mold growth in your home

Mold growing in homes can cause health problems for those who live there. It has been known to cause or exacerbate conditions such as asthma, allergies, and other respiratory problems. It can also damage your home and require thousands of dollars in mitigation services. To reduce the risks, here are some ways to prevent mold growth in your home.

1. Keep Indoor Humidity Levels Low to Prevent Mold Growth in Your Home

Molds require high moisture levels in order to thrive. Aim for keeping moisture levels in your home under 50%. Air conditioners and dehumidifiers help to keep your humidity levels down. It is important to remember that the amount of moisture in the air varies throughout the day depending on your activities.

2. Improve Ventilation

According to experts like J&M Cooling & Heating, ventilation helps air circulate around an indoor area. This circulation of air allows fresh air to enter and leave the home which discourages excess moisture. Areas like kitchens, laundry rooms, and bathrooms should have adequate ventilation since more moisture is generated in these places. Improve ventilation by opening windows periodically, using exhaust fans that vent outside of the home, and keeping ceiling fans on. You can also install HVAC systems via experts at sites like https://mullinsmechanical.com/ or https://otheating.com/. Torn between ac vs heat pump? Click the link if you want additional info on which one you should choose.

3. Fix Any Roof or Pipe Leaks

Other ways to prevent mold growth include fixing any leaks in the house. Leaks in the roof or plumbing system lead to water damage and subsequent mold growth in the house. Visit sites like https://stithplumbingandhvac.com/ or https://specialtypump.com/issaquah/ for additional guidance on plumbing.

Facing a water leak can be both alarming and damaging to your property. While it might be tempting to address the issue yourself, hiring a home plumbing repair service is the best choice here. A professional can identify and seal any leaks to keep water from collecting in the home to prevent mold growth in your home. Hire experts such as the ones at https://kmpcorp.com/fort-worth-plumbing-heating-air/ or https://superiorplumbing.net/plumbing-repair/ to prevent mold from growing in your home.

4. Clean Up and Dry Out After Flooding

Flooding is a coastal threat due to changing weather patterns and strong storms. When flooding occurs, moisture levels skyrocket. Mold can begin to grow in as little as 48 hours. The best way to prevent mold growth after flooding is by cleaning and drying out the area as soon as it is accessible. Installing a sump pump can aid in efficiently removing excess water and minimizing the risk of mold growth.

5. Use Mold-Resistant Paint and Mold-Killing Cleaning Products

Choosing mold-resistant paint can keep mold from growing whenever there are high levels of moisture. Another great way to prevent mold growth is to use mold killing products when cleaning the bathroom. A bathroom is a common place for mold to grow because of all the moisture there.

It’s important to remember that mold growth can be costly to remove and can cause health problems for you and your loved ones. Follow these suggested steps to help prevent mold growth in your home.

Read more

signs of roof trouble

A secure roof is a fundamental element of any home. The roof protects the structure from leaks, the sun and harmful UV rays, and other dangers. Your home’s roof also protects your valuables and keeps the rain, snow, and other elements from entering the home. Although the roof should last many years, trouble can strike before you know what’s happened. Know the signs of roof trouble and call a professional if you notice them.

Curling Shingles

Cupping and clawing shingles are signs of weathering. Both are also known as ‘curling’ and are a sign of roof problems. Once you notice curling, the roof may last another one to five years depending on the severity of the problem and other factors. It is a good idea to call a roofer to replace the roof if you notice a lot of shingles curling. Don’t invest your money into costly repairs when you should just have your roof replaced.

The Age of the Roof

Asphalt shingles, the most popular roofing material used on homes today, last between 20 and 25 years. Some may last as long as 30-years if they’re well-maintained architectural shingles. If the roof on your home is nearing the 20th birthday or has passed the mark, replacing the structure will prevent leaks and other damages before they occur.

Cracked Shingles

Wind usually causes cracked shingles. If just a couple of shingles have small cracks, it is worth replacing the individual shingles. But if the cracking isn’t isolated to a single area and there are more damaged than non-damaged, it is best to replace your entire roof. Visit sites like https://carolinahomespecialists.com/areas-we-serve/kernersville-nc/ to know more about roof replacement.

Loose & Missing Shingles

Although you can replace missing shingles, it is almost impossible to match a new shingle to the older shingle. Over time, weather, water, and the sun will affect the color of the shingles on the roof. Patchwork jobs suffice for a while, but when the roof begins looking more like a puzzle, it’s time to replace. If you need help, get first-rate roof maintenance from Knipp Roofing

Don’t Ignore The Signs of Roof Trouble

According to experts like Americana Roofing, your roof is the most valuable component of your home. It provides shelter from the elements and keeps your structure sound and your family safe. If these signs of roof trouble are present at your home, call a roofing professional for an estimate. Delaying roof repairs or a new roof is only asking for trouble; don’t make that mistake. The sooner you call a professional, the sooner you’ll enjoy worry-free, comfortable living again.

Read more

reduce humidity in the home

Your home is probably the single biggest purchase you’ll ever make. As a homeowner, it’s essential that you take steps to keep your home in good condition so it maintains its value. Excessive humidity is something to be aware of to protect your health and your home. Not only can humidity and moisture damage your home’s structure and your personal possessions, it can also create the ideal conditions for toxic mold which is harmful to you and your family’s health. Following these simple tips will help reduce humidity in the home so you can avoid these unwanted problems and discomfort.

1. Monitor Your Home’s Humidity Levels

If you suspect your home has high humidity, the first thing you should do is invest in a good quality humidistat. This way, you can constantly monitor the level of indoor moisture and take steps to reduce humidity in the home.

Ideally, your home’s indoor moisture content would remain around 45 percent or less, but this can sometimes be tough to achieve. Anything between 40 and 60 percent is usually okay, but you should take action if the humidity level rises above 70 percent since this creates ideal conditions for dust mites, mold, and mildew.

2. Make Sure to Keep Your Home Well Ventilated

One of the simplest ways to reduce humidity in the home is to keep it well ventilated. Just leaving a window cracked for a little while when it’s cool outside can be an effective way of creating a draft that allows and allowing trapped moisture to escape outside. Fans can also be a huge help by ensuring that warm, stale air gets properly circulated and speeding up the evaporation of moisture from the air.

3. Use Your Air Conditioner to Keep Your Home Dry on Humid Days

As with fans, air conditioners are also an effective way of drying out the air inside your home. On humid days, opening up your windows lets more moisture inside. This is a time when you should keep your house closed tight with the AC on. Although this will obviously increase your energy bills, the added cost will still be lower than what you’ll end up paying for mold removal or to repair moisture damage. If you need to install one, you can then call in experts from sites like https://liebermech.com/ or https://affordableairsolutions.net/ to do what’s needed.

4. Make Sure Your Air Conditioner and Furnace Filters Are Clean

It is a good idea to regularly check the filters in your home’s air conditioner to make sure they aren’t dirty or clogged. Clogged filters can reduce the amount of air flow in your HVAC system, which means your furnace or air conditioner won’t be able to help dry out your air nearly as effectively. Clean or replace your air filters regularly according to the manufacturer’s recommendation. Visit sites like https://thewirenut.com/services/furnace-installation/ for additional guidance or hire experts like Performance Air Conditioning of Texas.

5. Hang Your Clothes Outside to Dry

Hanging your clothes inside to dry is a bad idea if you already have problems with humidity. As the clothes dry, the moisture that evaporates from them becomes trapped inside your house and will worsen the problems. Consider hanging your clothes outside to dry whenever possible. Using your home’s clothes dryer, and other appliances that create heat and moisture also tends to increase humidity in the home.

6. Take Shorter, Colder Showers to Reduce Humidity in the Home

Excessive humidity is especially common in bathrooms, which is why so many people choose to install ventilation fans. Simply running the fan during and after your shower will help reduce humidity in the home. However, you can take things even further by taking shorter or colder showers. The less steam created as a result of your shower, the less humidity you’ll have to worry about.

7. Take Advantage of Your Kitchen’s Exhaust Fan

The kitchen is another room that’s often susceptible to higher levels of humidity. Cooking is usually the main culprit in this regard, which is why it’s important to use your hood or exhaust fan every time you have something in the oven or on the stovetop. Keeping your pots and pans covered also helps limit the amount of moisture that evaporates into the air as you cook.

8. If All Else Fails, Consider Using a Dehumidifier

Depending on how bad your humidity problems are, the above methods may be more than enough to eliminate any major moisture issues. However, if you’re still noticing high humidity levels even after following all these tips, it’s probably time to consider using a dehumidifier in any rooms that continue to have problems.

At the end of the day, there are a number of different things that will help you reduce humidity in the home. Still, the most important thing is that you begin to do something. After all, not taking care of your humidity problems now likely means you’ll have even bigger problems to deal with in the future.

Read more

pool safety tips

Remember these Pool Safety Tips this Summer

Basic pool safety is often a no-brainer, but aside from not running on the deck or patio and avoiding diving into shallow water, there are many other things you can do to make your pool is safe. Here are five pool safety tips to keep in mind to prevent accidents from happening on your property.

1. Get a Pool Gate

If young children or pets will be near your pool, a gate is a necessity. A gate keeps your pool secure from those who may accidentally fall in and be in danger. A pool that is totally enclosed by a fence and gate will also be more desirable to potential buyers if you decide to sell your home.

2. Keep The Deck Clean

Tripping or slipping hazards on the pool deck can be a recipe for disaster. Not only could someone fall and hit their head, but you also risk someone falling into the pool and injuring themselves. Be sure to eliminate clutter on your pool deck and keep it free of debris that could cause someone to slip and jeopardize pool safety.

3. Install a Cover

If a gate isn’t a feasible option, a pool cover may be the next best thing in terms of pool safety. A cover will be placed over the top of your pool, keeping people from sneaking into it at night. Using a cover can also keep your pool warmer, especially if you don’t have a heater. Keep in mind that staying proactive about addressing common water heater problems is crucial to maintaining a comfortable and enjoyable poolside experience.

4. Check Chemical Levels to Ensure Pool Safety

Aside from drowning, another big pool safety hazard is unbalanced chemicals. If the chlorine and PH levels in your pool become off balance, the water could become hazardous to swim in. You should regularly test the chemicals in your pool and make adjustments as necessary. It’s also important to shock your pool on a regular basis in order to remove any bacteria. You may always hire a professional to maintain your pool if there is any part of it that requires complex passwords that you are not comfortable with.

5. Put in Pool Lights

Swimming at night is fun, but extra caution must be taken. Even if you have adequate lighting on your deck, it’s important to have a lights from plafondlampen in your pool so that swimmers can see where they are going. A light also lets those sitting on the deck to see if something goes wrong in the water. Underwater pool lighting creates an even better experience for your swimmers. Never swim at night alone–in fact, it’s not a good idea to swim alone at any time.

Click here คลิกที่นี่เพื่อค้นพบ UFA เว็บไซต์เดิมพันแห่งใหม่ที่คุณชื่นชอบ to discover UFA, your new favorite betting site.

Whether you’re just installing a pool, purchasing a home with a pool, or have had a pool for years, be sure to consider these pool safety tips to make sure your home’s pool is safe and secure. The last thing you want is someone getting hurt at your pool when these pool safety tips could have helped avoid it.

Walton Inspection Services performs swimming pool and spa inspections to home buyers, homeowners, and home sellers in Murrells Inlet and the surrounding area. To book your pool inspection or another home inspection service, contact us.


Read more

home inspection tips

Home Inspection Tips for a Better Inspection Experience

A quality home inspection is a significant part of both Property Buyers and sellers transactions. The best home inspections go beyond inspecting the structure, systems, and components of your home by also providing the opportunity for you to learn more about your property and how to maintain your biggest investment. Here are our home inspection tips to help you get the most out of your inspection:

1. Choose the Right Inspector

Being a home inspector comes with a lot of responsibility. They have to stay current with laws, continue their education, know what to look for, and to be able to clearly communicate their findings to all sorts of people. You should do research into your home inspector before hiring him or her to perform your home inspection. Looking at previous customer reviews for the home inspectors you are considering is an important part of our home inspection tips.

Ask home inspectors about their inspection experience, about their training, and what jobs they performed before becoming a home inspector—it’s usually a good sign if they have a history in home renovations, building, or contracting. You’ll also want to choose a home inspector who you trust and who makes you feel comfortable. This person will need to be able to clearly convey important information to you.

2. Don’t Skip Your Home Inspection

You don’t have to attend your home inspection, but it’s highly recommended that you do so. You won’t need to be there for the entire process (in fact, that could slow the inspector down), but you should be present at the end so that your home inspector can explain things to you that you might not catch simply from reading your home inspection report.

Many home inspectors welcome questions, even after the report is in your hands and the inspection is over. While the inspection report should include plenty of photographs, some issues may be discovered that will be easier to explain and review in person.

3. Get New Construction Inspected

All too often, homebuyers make the mistake of assuming that just because a home is a new construction, it won’t have any defects. This couldn’t be further from the truth. Whether it be from faulty workmanship or simple human error, new construction can have problems, and it’s best to catch them as early as possible. Be sure to have a professional home inspector visit the site to provide an unbiased 3rd party point of view while inspecting your new home prior to your final walkthrough with the builder.

4. Take More Than a Glance at the Inspection Report

Whether you’ve attended the home inspection or not, you’re should read your inspection report thoroughly. The report should be easy to understand, contain recommendations for addressing any noted defects, and contain helpful pictures. If you have any questions whatsoever about your report, don’t hesitate to contact your home inspector so that he or she can offer an explanation. It’s crucial that you understand your home inspection report!

5. Prepare Your Home for the Inspection

The home inspector will need access to all areas of your house, including the basement and the attic, so make sure that it’s going to be easy for them to get in there. Another home inspection tip is to provide keys to any locked entryways so that the inspector isn’t locked out of an area to be inspected.

Take Your Home Inspector’s Recommendations Seriously

As a buyer, your agent will help when it comes to negotiating with the seller about how to deal with any defects discovered by your home inspector. Still, some issues just don’t get resolved. In those cases, it’s going to be up to you to make sure that they’re dealt with before you close on the home. You may need to turn to a specialized expert for advice regarding how to deal with certain issues, such as an electrician or a roofer. Ask for a free estimate—it couldn’t hurt.

6. Don’t Skip the Pre-Listing Inspection

Our home inspection tips aren’t just for buyers! Sellers can get pre-listing inspections prior to putting their homes on the market in order to uncover any defects or safety issues that would later be found by a buyer’s inspector. By having a pre-listing inspection, sellers have the chance to make repairs and to present a better product that is more likely to get its asking price and to stay on the market for a shorter period of time.

We hope you find our home inspection tips helpful for your next inspection. Walton Inspection Services provides home inspections to all of Horry and Georgetown counties in South Carolina. To schedule an inspection, contact us.

Read more